aplib
Tactical BDI Agent Framework for Java
Data Collection
Author: Wishnu Prasetya
Prerequisite: you have read at least the following tutorials:
iv4xrTutorial 1, explaining the basic of how to use aniv4xragent for testing.iv4xrTutorial 2, explaining an architecture where we pretend that the program to test is an external program. We will use this architecture in this tutorial.
Consider again the setup as in iv4xr Tutorial 2 where we want to test a simple game called GCD game. Let us create an agent called “agentSmith”, with some-role-name (which does not matter for this tutorial):
var agent = new TestAgent("agentSmith","some role") ;
		agent . attachState(new MyState())
		      . attachEnvironment(new GCDEnv())
		      . setTestDataCollector(new TestDataCollector())
		      . setGoal(topgoal);
Well, before we get to that let’s first create a test agent, and a goal for it. The goal does not matter for this tutorial; just something so that the agent has something to do:
var agent = new TestAgent("agentSmith","some role") ;
Let’s also define a goal. It does not matter what; for this example we just need the agent to do something. In this case the goal is to get the agent to the grid location (100,99) in the GCD-game:
var topgoal = goal("tg")
			  .toSolve((MyState S) -> S.x == 100 && S.y == 99)
			  .withTactic(...)
			  .lift();
Let’s attach a state and a proper environment (in this case: an instance of GCDEnv) to the agent, and we assign the above goal to the agent too:
agent . attachState(new MyState())
	  . attachEnvironment(new GCDEnv())
	  . setTestDataCollector(new TestDataCollector())
      . setGoal(topgoal);
Data-collector
To collect trace we will need to attach a data-collector to the agent. This is already done above through the method setTestDataCollector().
Instrumenter
We also need to attach an ‘instrumenter’, which is a point that extract values from a state (you decide which values/parts of the state to extract), and bundle them in a ‘data-point’. Technically, this data point is a set of name-value pairs (more precisely, an instance of Pair<String,Number>[]). Suppose we already have a method that acts as such an instrumenter:
Pair<String,Number>[] instrumenter(MyState st) { ... }
This is how to attach it to the agent:
agent.withScalarInstrumenter(state -> instrumenter((MyState) state))
The following instrumented is used:
Pair<String,Number>[] instrumenter(MyState st) {
	Pair<String,Number>[] out = new Pair[5] ;
	out[0] = new Pair<String,Number>("posx",st.x) ;
	out[1] = new Pair<String,Number>("posz",st.y) ;
	out[2] = new Pair<String,Number>("time",st.time) ;
	out[3] = new Pair<String,Number>("gcd",st.gcd) ;
	out[4] = new Pair<String,Number>("win",st.win ? 1 : 0) ;
	return out ;
}
Running the agent and collecting the trace
The following will run the agent:
while (!topgoal.getStatus().success()) agent.update() ;
After that, agent.getTestDataCollector().getTestAgentScalarsTrace(agent.getId()) will give us the trace that was collected when the agent was ran above. However, let us clean this trace a bit so that we get a list/sequence of values:
List<Map<String,Number>> trace = agent
				. getTestDataCollector()
				. getTestAgentScalarsTrace(agent.getId())
		        . stream()
		        . map(event -> event.values) . collect(Collectors.toList());
Printing and saving a trace
You can print this trace if you want. Just do:
System.out.println(trace) ;
To save the trace in a csv-file do:
   agent.getTestDataCollector()
        .saveTestAgentScalarsTraceAsCSV(agent.getId(),"trace11.csv");
The resulting file looks like this:
gcd,posx,posz,time,win
1,7,17,1,1
1,7,18,2,1
1,7,19,3,1
1,7,20,4,1
...
Data analysis and visualisation
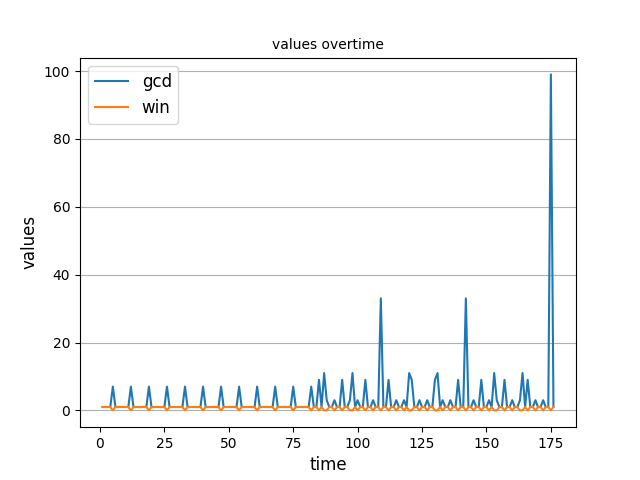
Collected traces are csv-files containing numeric values, so they can be subjected data analyses and visualisation with external tools. The project itself contains several Python-scripts to produce time-graphs and heatmaps from trace files. The scripts can be found in ./python/src/aplib. Running one with the --help option will show available options. An example of produced timegraph is shown below:

This is a heatmap showing visits in locations in a game world:
